Excel 2007
Sorting, Grouping, and Filtering Cells
Introduction
 A Microsoft Excel spreadsheet can contain a great deal of information. With more rows and columns than previous versions, Excel 2007 gives you the ability to
analyze
and work with an
enormous amount of data
. To most effectively use this data, you may need to manipulate it in different ways.
A Microsoft Excel spreadsheet can contain a great deal of information. With more rows and columns than previous versions, Excel 2007 gives you the ability to
analyze
and work with an
enormous amount of data
. To most effectively use this data, you may need to manipulate it in different ways.
In this lesson, you will learn how to
sort
,
group
, and
filter
data in various ways that will enable you to most effectively and efficiently use spreadsheets to locate and analyze information.
Sorting, grouping, and filtering
Download the example to work along with the video.
A Microsoft Excel spreadsheet can contain a great deal of information. Sometimes you may find that you need to reorder or sort that information, create groups, or filter information to be able to use it most effectively.
Sorting
Sorting lists is a common spreadsheet task that allows you to easily reorder your data. The most common type of sorting is alphabetical ordering, which you can do in ascending or descending order.
To sort in alphabetical order:
- Select a cell in the column you want to sort (In this example, we choose a cell in column A).
- Click the Sort & Filter command in the Editing group on the Home tab.
- Select Sort A to Z . Now the information in the Category column is organized in alphabetical order.
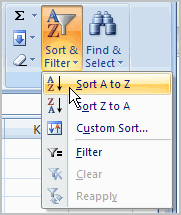
You can Sort in reverse alphabetical order by choosing Sort Z to A in the list.
To sort from smallest to largest:
- Select a cell in the column you want to sort (a column with numbers).
- Click the Sort & Filter command in the Editing group on the Home tab.
- Select From Smallest to Largest . Now the information is organized from the smallest to largest amount.
You can sort in reverse numerical order by choosing From Largest to Smallest in the list.
To sort multiple levels:
- Click the Sort & Filter command in the Editing group on the Home tab.
-
Select
Custom Sort
from the list to open the dialog box.
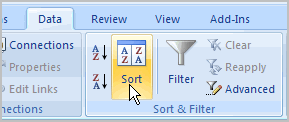
OR - Select the Data tab.
- Locate the Sort and Filter group.
- Click the Sort command to open the Custom Sort dialog box. From here, you can sort by one item or multiple items.
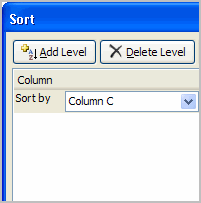
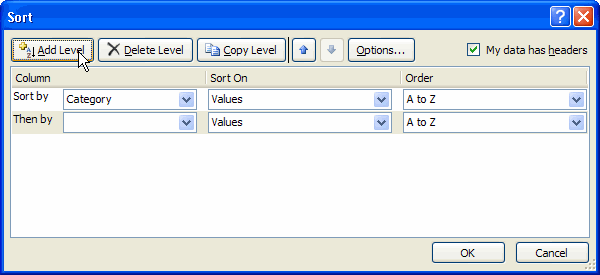
- Click the drop-down arrow in the Column Sort by field, then choose one of the options—in this example, Category.
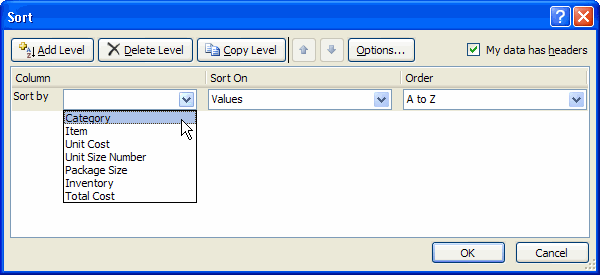
- Choose what to sort on . In this example, we'll leave the default as Value .
- Choose how to order the results . Leave it as A to Z so it is organized alphabetically.
- Click Add Level to add another item to sort by.
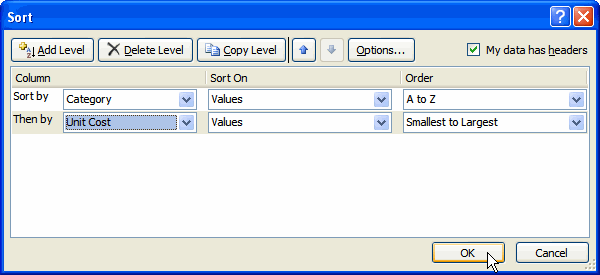
- Select an option in the Column Then by field. In this example, we chose Unit Cost.
- Choose what to sort on . In this example, we'll leave the default as Value .
- Choose how to order the results . Leave it as smallest to largest .
- Click OK .
The spreadsheet has been sorted. All of the categories are organized in alphabetical order, and within each category the unit cost is arranged from smallest to largest.
Remember that all of the information and data is still here—it's just in a different order.
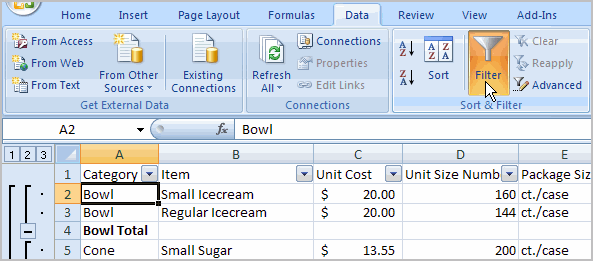
Grouping cells using the Subtotal command
Grouping is a useful Excel feature that gives you control over how the information is displayed. You must sort before you can group . In this section, we will learn how to create groups using the Subtotal command.
To create groups with subtotals:
- Select any cell with information in it.
- Click the Subtotal command on the Data tab. The information in your spreadsheet is automatically selected, and the Subtotal dialog box appears.
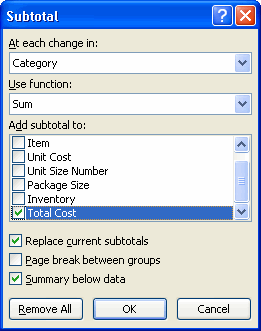
- Decide how you want things grouped. In this example, we will organize by Category .
- Select a function . In this example, we will leave the SUM function selected.
- Select the column where you want the Subtotal to appear. In this example, Total Cost is selected by default.
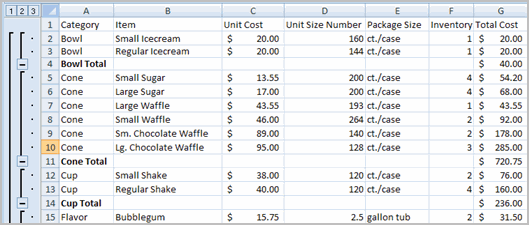
- Click OK . The selected cells are organized into groups with subtotals .
To collapse or display the group:
- Click the black minus sign, which is the hide detail icon, to collapse the group.
- Click the black plus sign, which is the show detail icon, to expand the group.
- Use the Show Details and Hide Details commands in the Outline group to collapse and display the group as well.
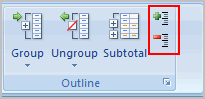
To ungroup select cells:
- Select the cells you want to remove from the group.
- Click the Ungroup command.
- Select Ungroup from the list. A dialog box will appear.
- Click OK .
To ungroup the entire worksheet:
- Select all cells with grouping.
- Click Clear Outline from the menu.
Filtering cells
Filtering, or temporarily hiding, data in a spreadsheet is simple. This allows you to focus on specific spreadsheet entries.
To filter data:
- Click the Filter command on the Data tab. Drop-down arrows will appear beside each column heading.
- Click the drop-down arrow next to the heading you would like to filter. For example, if you would like to only view data regarding Flavors , click the drop-down arrow next to Category .
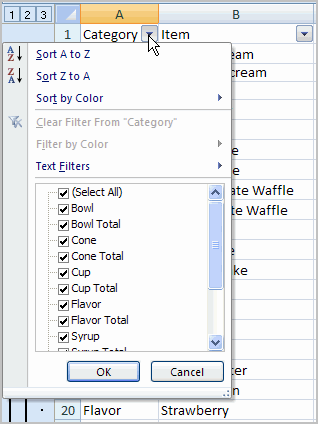
- Uncheck Select All .
- Choose Flavor.
- Click OK. All other data will be filtered, or hidden, and only the Flavor data is visible.
To clear one filter:
- Select one of the drop-down arrows next to a filtered column.
- Choose Clear Filter From...
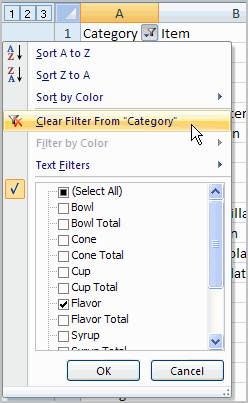
To remove all filters, click the Filter command.
Filtering may look a little like grouping, but the difference is that now you can filter on another field if you want to. For example, let’s say you want to see only the vanilla-related flavors. Just click the drop-down arrow next to Item, then select Text Filters . From the menu, choose Contains because you want to find any entry that has the word vanilla in it. A dialog box appears. Type vanilla, then click OK. Now we can see that the data has been filtered again and that only the vanilla-related flavors appear.
Challenge!
Use the Inventory workbook or any workbook you choose to complete this challenge.
- Use the Sort command to sort data alphabetically.
- Use the Sort command to sort data numerically from smallest to largest.
- Create groups using the Subtotal command.
- Practice using the Filter command.